Introduction
Deployment variants
The components of the IIoT Building Block Stack are very modular and based on a microservice architecture. Therefore, the deployment is as flexible as possible and fits very well into existing infrastructures.
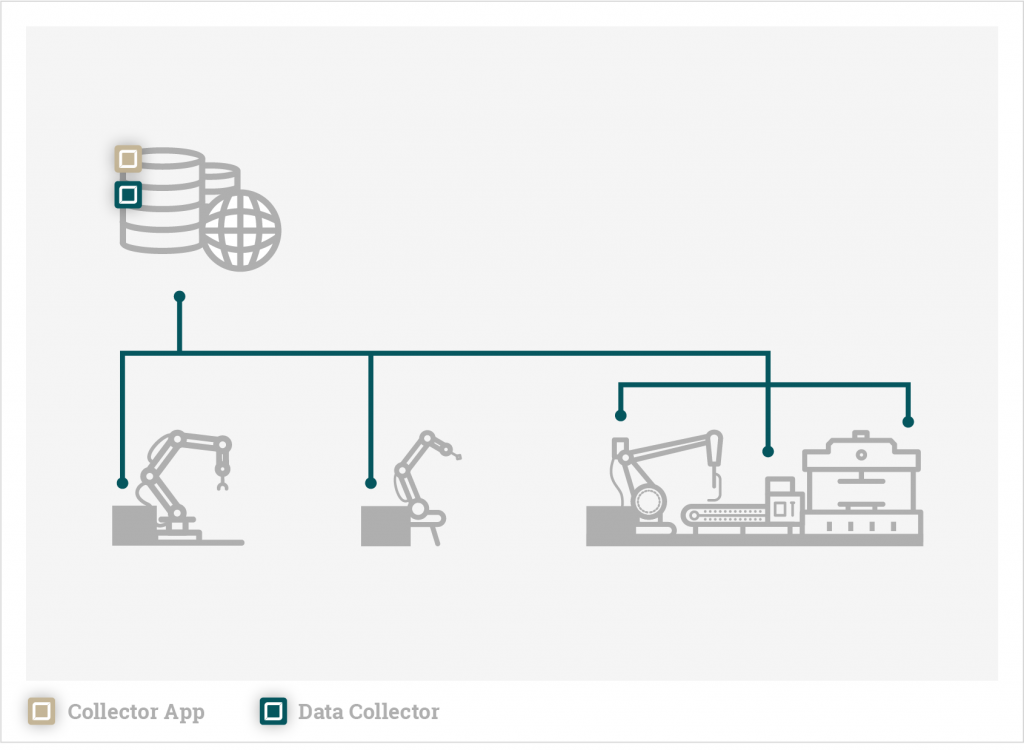
One server installation
The entire stack is installed on one machine/server:
- Collector
- Collector App
- Database

The Collector collects data from different machines and assets via a network interface and stores it on the central database installed next to the Collector on the same machine. Via the Collector App, also on the same server, one more Collector has to be configured.
If the network is disturbed, no data can be transferred. Data may be lost under certain circumstances.
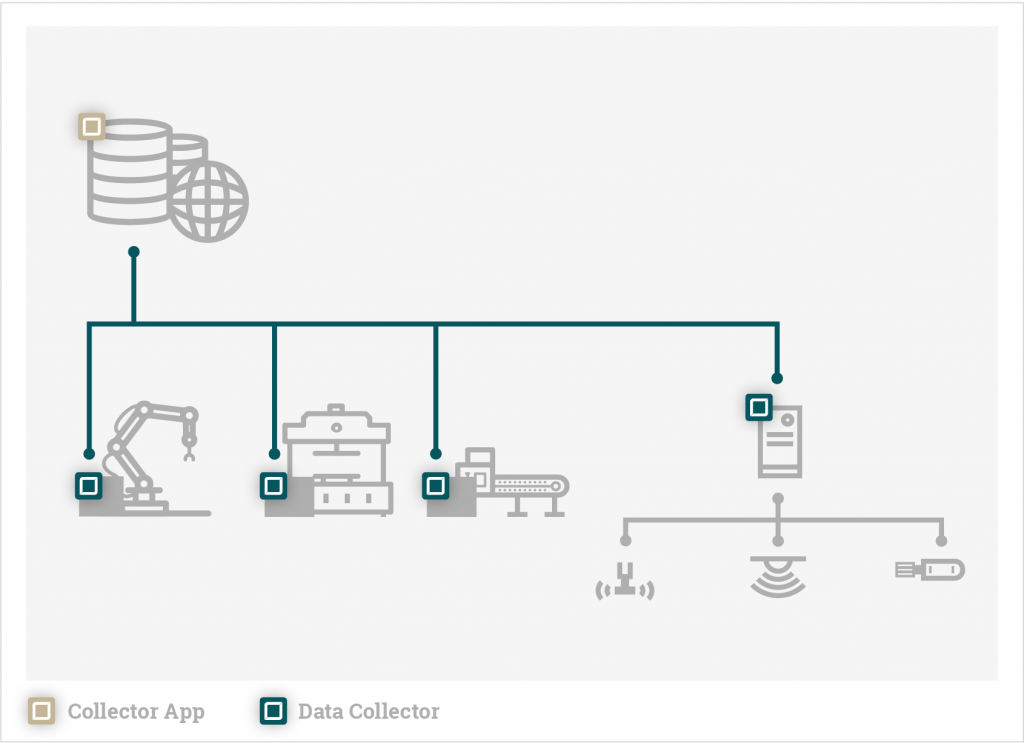
Distributed system
Several Collector instances can be installed in the network. The Collector can even run directly on PC-based controllers. The Collector App and the database are located on a central machine computer/server.

In the Collector App all collectors in the network can be configured via a user interface. The collectors can buffer the data in case of a network failure and send suggestive over the network to the database after the failure is fixed.
Getting Started
For a quick start, it is recommended to install the entire stack on a machine first.
Quick start with docker-compose
The easiest and most reliable way to deploy the stack is via Docker, since the applications run in defined container environments and thus have no dependencies on the host system. In addition, the containers can be completely removed from the system after termination.
Installing Docker (Linux, Mac and Windows): Get-Docker
A license is required for Windows and Mac Docker installation. Alternatively, Rancher-Desktop can be installed as a container runtime. If Rancher-Desktop is used with containerd the docker cli must be replaced by nerdctl in the following.
To be able to start multiple containers directly with one command, Docker Compose is used. In a docker-compose file multiple containers can be defined with configuration and linking. In this case, the containers are as follows:
- Collector
- Collector App
- OPC UA Browser
- InfluxDB
- Grafana
Therefore, make sure that you have loaded the images for Collector, Collector-App and OPC UA Browser according to the installation instructions.
The InfluxDB and Grafana image is automatically loaded from the official online repository. InfluxDB is used as demo data sink and Grafana is used to display data stored by the Data Collector.
1. Creating a folder
mkdir iiot-bb-stack
cd iiot-bb-stack
2. Creating the Shard Volume Folder
Since containers do not have persistent storage, all persistent files and databases must be stored on the host system so that the state is not lost after the container reboot.
mkdir dockerThe folder will be used in the Container volumes.
3. Creating the compose file
Linux
touch docker-compose.yamlWindows
New-Item -Path . -Name "docker-compose.yaml" -ItemType "file"Open file with your favourit editor and past that in:
docker-compose.yaml
version: "3.4"
services:
  collector:
    image: ite-si/collector:vx.x.x
    volumes:
      - ./docker/collector:/opt/ite-si/collector/tmp
    links:
      - influxdb
    environment:
      - COLLECTOR_WORK_DIR=/opt/ite-si/collector
      - COLLECTOR_CONFIG_DIR=/opt/ite-si/collector/tmp
      - COLLECTOR_LOG_DIR=/opt/ite-si/collector/tmp/logs
      - COLLECTOR_CONSOLE_LEVEL=warn

  opcua-browser:
    image: ite-si/opcua-browser:vx.x.x
    volumes:
      - ./docker/collector/certificates:/opt/ite-si/opcua-browser/certificates

  collector-app:
    image: ite-si/collector-app:vx.x.x
    ports:
      - "4000:4000"
    environment:
      - COLLECTOR_APP_HOST=0.0.0.0
      - COLLECTOR_APP_PORT=4000
      - COLLECTOR_APP_TOKEN_SECRET=asdfasdfjklasdcpwerasdfvuewardciadioweroqwer
      - COLLECTOR_APP_ENCRYPTION_KEY=e44c966f21b9e1577802464f8924e6a37e3e9751fa01304213b2f845d8841d61
      - COLLECTOR_APP_CORS_ORIGIN=http://localhost:4000
      - COLLECTOR_APP_PUBLIC_GRAPHQL_URL=http://localhost:4000/api/graphql
      - COLLECTOR_APP_PUBLIC_WS_URL=ws://localhost:4000/api/subscriptions
    volumes:
      - ./docker/collector-app:/var/lib/collector-app

  grafana:
    image: grafana/grafana:latest
    ports:
      - "3000:3000"
    links:
      - influxdb
    volumes:
      - ./docker/grafana:/var/lib/grafana

  influxdb:
    image: influxdb:1.8
    volumes:
      - ./docker/influxdb:/var/lib/influxdb
4. Starting the stack
docker-compose upor
nerdctl compose -f docker-compose.yaml upTo start in the background:
docker-compose up -dor
nerdctl compose -f docker-compose.yaml up -d5. Launch Collector App
Once launched, the app is accessible in the browser at http://localhost:4000/collector-app.
Default login:
| username | password |
|---|---|
| admin | admin |
An introduction to the Collector App can be found here.
6. Stopping/Removing the Stack
docker-compose down
docker-compose rm
or
nerdctl compose -f docker-compose.yaml down
nerdctl compose -f docker-compose.yaml rm
Quick start under Windows (native)
1. Installer
First, the components:
should be installed via the installer according to the Windows installation instructions.
As Demo Output the InfluxDB can be installed.
As demo input the OPC UA Sample Server from Unified Automation is recommended.
2. Starting the components
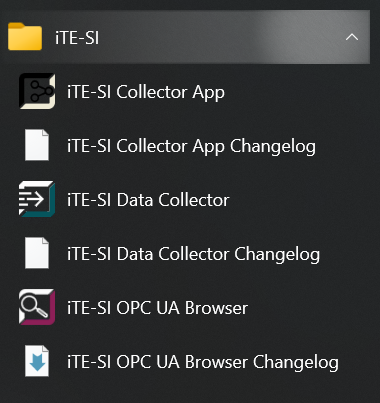
The components can be started via the Windews start menu:

After all three components have been started, a Windows tray icon appears in the taskbar. Here the log can be displayed and the application can be closed.
3. Start Collector App
After starting, the app can be accessed in the browser at http://localhost:4000/collector-app.
Default login:
| username | password |
|---|---|
| admin | admin |
An introduction to the Collector App can be found here.
Translated with www.DeepL.com/Translator (free version)